Fuel Filler

Superlite provides a nice Sparco fuel filler cover. However, because I added a supercharger, the fuel funnel was t-boning the induction tube and the throttle body. Most SL-C builders simply clamp a flex hose to the fuel funnel and run it on the engine side of the 2” x 2” chassis tube, but the only way to make it work in my situation was to modify the funnel which is made of thin, spun aluminum. It’s a good thing that Abe can do that type of welding in his sleep, because I would have burned right through it. The steps were as follows:

  • Cut the filler neck (see red “X” in picture below).

  • Weld a piece of aluminum to close the opening.

  • Drill a 2” hole in the bottom corner (a funky angle).

  • Weld the 2” tube into the outside and the inside of the hole.

  • Add a bead to help hold the flex tube in place.

I’m very happy with how it worked out. It easily clears the chassis and I think it will actually work better than the standard approach because the fuel stream is pointed down into the tank rather than into a 90-degree bend. In addition, the fuel tank inlet has a 2” diameter and the funnel has a wider (I believe 2-1/4” ) diameter. The discrepancy is typically solved by the use of an adapter and a set of clamps. By using a 2” tube I didn’t need the adapter or clamps.

Wazer

The Wazer is the world’s first desktop water jet. I’ve been watching them since their Kickstarter campaign in 2016. I placed a preorder so long ago I forgot when, but after many delays it finally arrived. It has a cutting area of 12" x 18" (305 mm x 460 mm) and can cut a wide range of materials including (larger list here);

  • 1/16” 6061 aluminum at 3 in/min

  • 1/2” 6061 aluminum at 0.5 in/min

  • 1/8” carbon fiber at 1.3 in/min

  • .016” Neoprene, 50A at 74.8 in / min

  • 1/8” steel 1008 at 0.9 in/min

It’s delivered on a 500-pound crate which includes two 55-pound buckets of garnet abrasive. Everything from the packaging to the documentation to the equipment seems top notch. You definitely need two people to set the things up because both the cutter and pump each weigh over a hundred pounds. I won’t do an unboxing video because there is one here.

The machine comes with a rectangular piece of 0.1” aluminum mounted to the cutting table and a test file for a WAZER-engraved bottle opener. The result was a perfect cut and a great out-of the-box experience.

First car Part

The first usable part that I cut was a spacer for the upgraded front QA1 ball joints. This didn’t go as well. As can seen in the picture on the left, the top surface was cut very cleanly. However, the picture on the right shows the bottom surface of which only a small fraction of the cut fully penetrated resulting in the entire piece being junk. Of the 12 pierce operations, only 5 went all of the way through. This is disappointing because 1/4” 6061 aluminum is extremely common and one would think that they would have that configuration working out of the box. The aluminum was from McMaster with a +/- 0.008 tolerance so it’s high-quality new stock. I mic’d it just to be sure and it was well within tolerance.

I should have cut a small test piece before going for the whole part. BTW, if the water is in cutting mode (i.e., moving) and it isn’t cutting all of the way through the jet will bounce back and some of it will find its way out of the gaps between the body and lid. The above mis-cut resulted in a fair amount of water and abrasive on the floor. Note that when the jet is in pierce mode (i.e., stationary) the jet bonces straight up and very little if any water or abrasive escapes. I’ve learned that there is a distinct difference in sound when the water jet is piercing or not cutting all of the way through vs. cutting all of the way through.You need to pay attention or you might waste abrasive and have a mess.

Fortunately, there is an easy way to change the cutting parameters. The Cutting Speed is set separately for the three different cut qualities: Rough, Medium and Fine. As quality increases, so does time and abrasive consumption. Here are the default / my settings for the parameters:

  • Fine Cutting Speed (in/min): 0.701 / 0.680

  • Pierce Time (sec): 79 / 81

  • Lead In/Out: (in) 0.038 / 0.038

  • Tab Width: (in) 0.017 / 0.02

The resulting cut quality was excellent and I was very happy with the part. That said it took one 67 minutes to cut and consumed a whopping 22.1 lbs of abrasive… a commercial water jet it is not! If you look at the table you will see that the cost of abrasive is heavily impacted by how you purchase it. On a per-pound basis, a pallet costs 69% less if you ship it to a residential address and 72% less if you ship it to a commercial address (lift gate service is provided in both scenarios).

These costs don’t include electric or water consumption. In addition, the cut bed is made of plastic and is a consumable item. It’s 4” thick and can be flipped so you get two sides. The machine comes with two cutting tables and replacements costs $79. Durability will be highly dependent on what’s cut and how much care is taken to spread the cuts around. Time will tell.

At the 87% completion point, cutting was stopped and I was prompted to refill the abrasive hopper and empty the used abrasive buckets. I restarted the cut and about a minute later cutting stopped again and I was prompted to clean the drain filters. In all three cases there was plenty of capacity to complete the part, but since they don’t have sensors for these items I assume that these are just conservative settings.

Second car Part

I then made gaskets for the adapters that are used when swapping the stock LS7 mechanical pump for an electric one. This demonstrates the diversity of a water jet, changing from 1/4” aluminum to a thin gasket without the need to change any tooling. The gasket was cut in 41 seconds which is half as long as a single pierce for the 1/4” aluminum which made it a lot more entertaining to watch.

IMG_6143.jpg

Wazer vs. Commercial WATER JET

Will (a.k.a. “pnut” on the forum) designed a spacer two years ago and he had it cut by a local water jet shop. After a lot of back and forth he was able to 12 pieces for $255 or $21.25 per part. Will’s part is on the left and mine is one the right. Will may weld better than me, but my CAD skills are better! Will contracted for a middle-of-the-road cut quality and I cut mine at the highest quality. If you compare the cut edges in the the second picture you will note that Wazer is capable of nice cuts.

The quote that Will received was divided into nearly equal thirds; project management, CAM configuration and cutting time. So, a quantity of two would have have had a unit cost of around a $100. The high cost at low-volume is due to paying someone to manage the process and a minimum cut fee. Basically 12 cost the same as two. For this part, beyond 12 is where a commercial supplier becomes cost effective.

To compare costs on a apple-to-apple basis I removed the the six lightening slots from my design which reduced the Wazer’s cut time to 40 minutes and 13.1 pounds of abrasive. The following table provides several price comparisons.

Low-volume price advantage aside the real advantage is cycle time. Will had to make several phone calls and send several emails. There was at least one delay and end-to-end it took several weeks to get his parts. If he had made a mistake it would have taken him a week or two for the next iteration. With the Wazer you can design the part and cut a prototype in thin plastic in a few minutes and quickly iterate until,you get it right at which point you cut the final part.

Nose Hinge

Prototype nose hinge mounted to Bob’s car

Prototype nose hinge mounted to Bob’s car

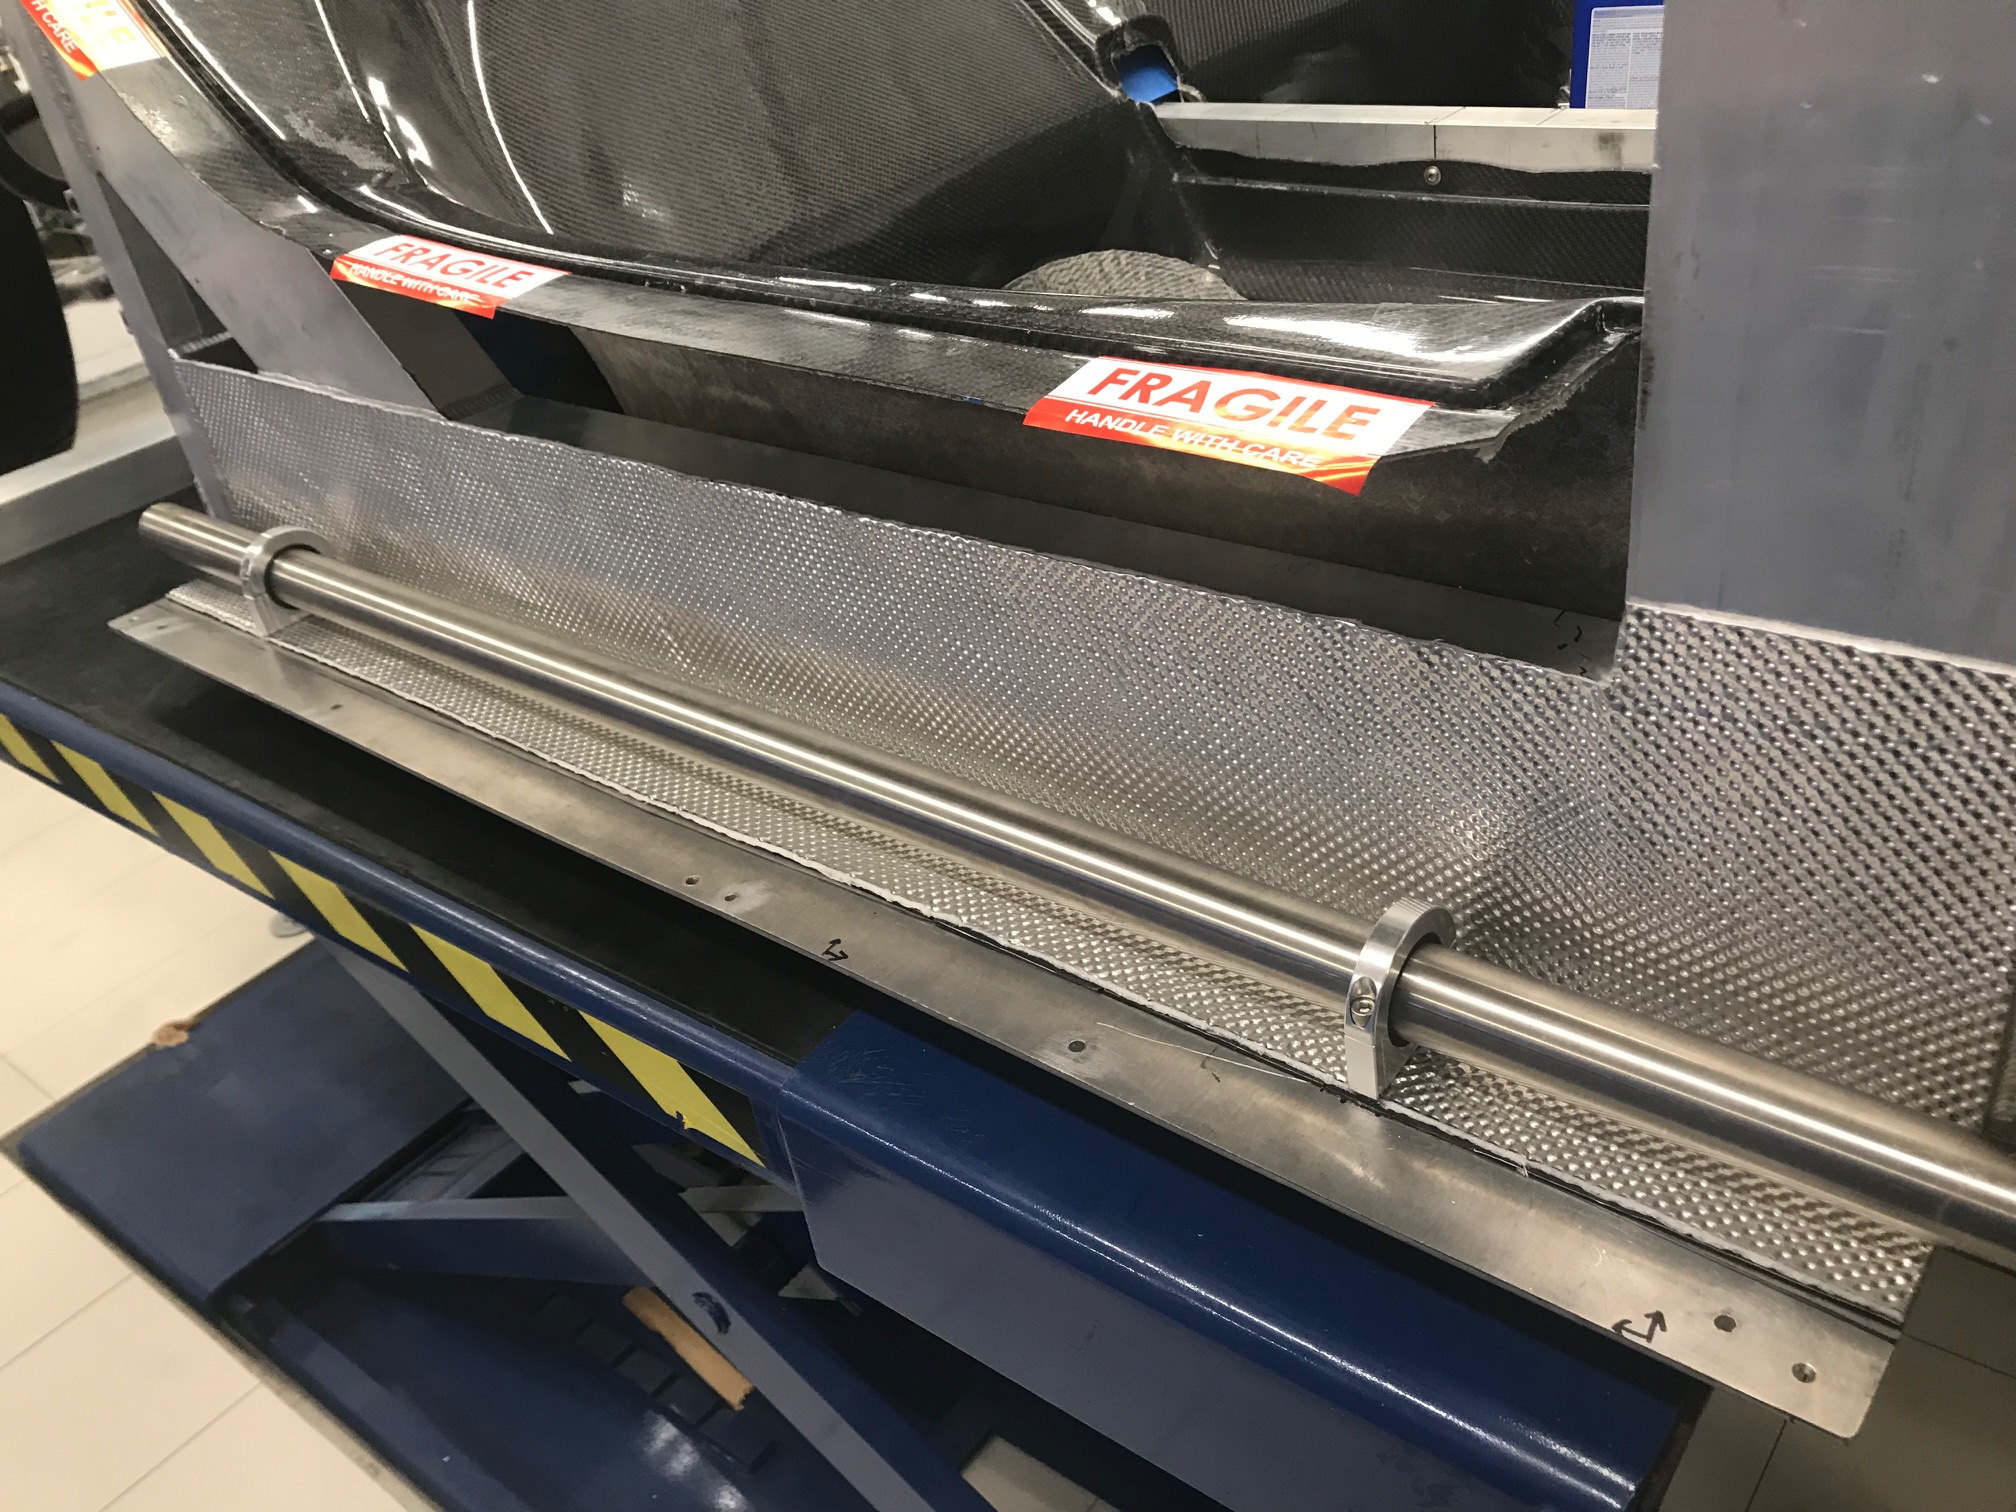
The SL-C’s nose is designed to lift off as a single piece. This works great for a race car because there are always crew members around to help you lift it off and you’re not worried about chipping the paint. However, if your crew is composed of your wife and kids, they’re not always available nor happy to be dragged to the garage when watching a movie or sleeping – yeah, last time I woke someone up to help move the nose it didn’t go well. Even with willing familial assistance you have to disconnect the wiring harness, make room to store the nose and you need to be careful not to scratch the paint.

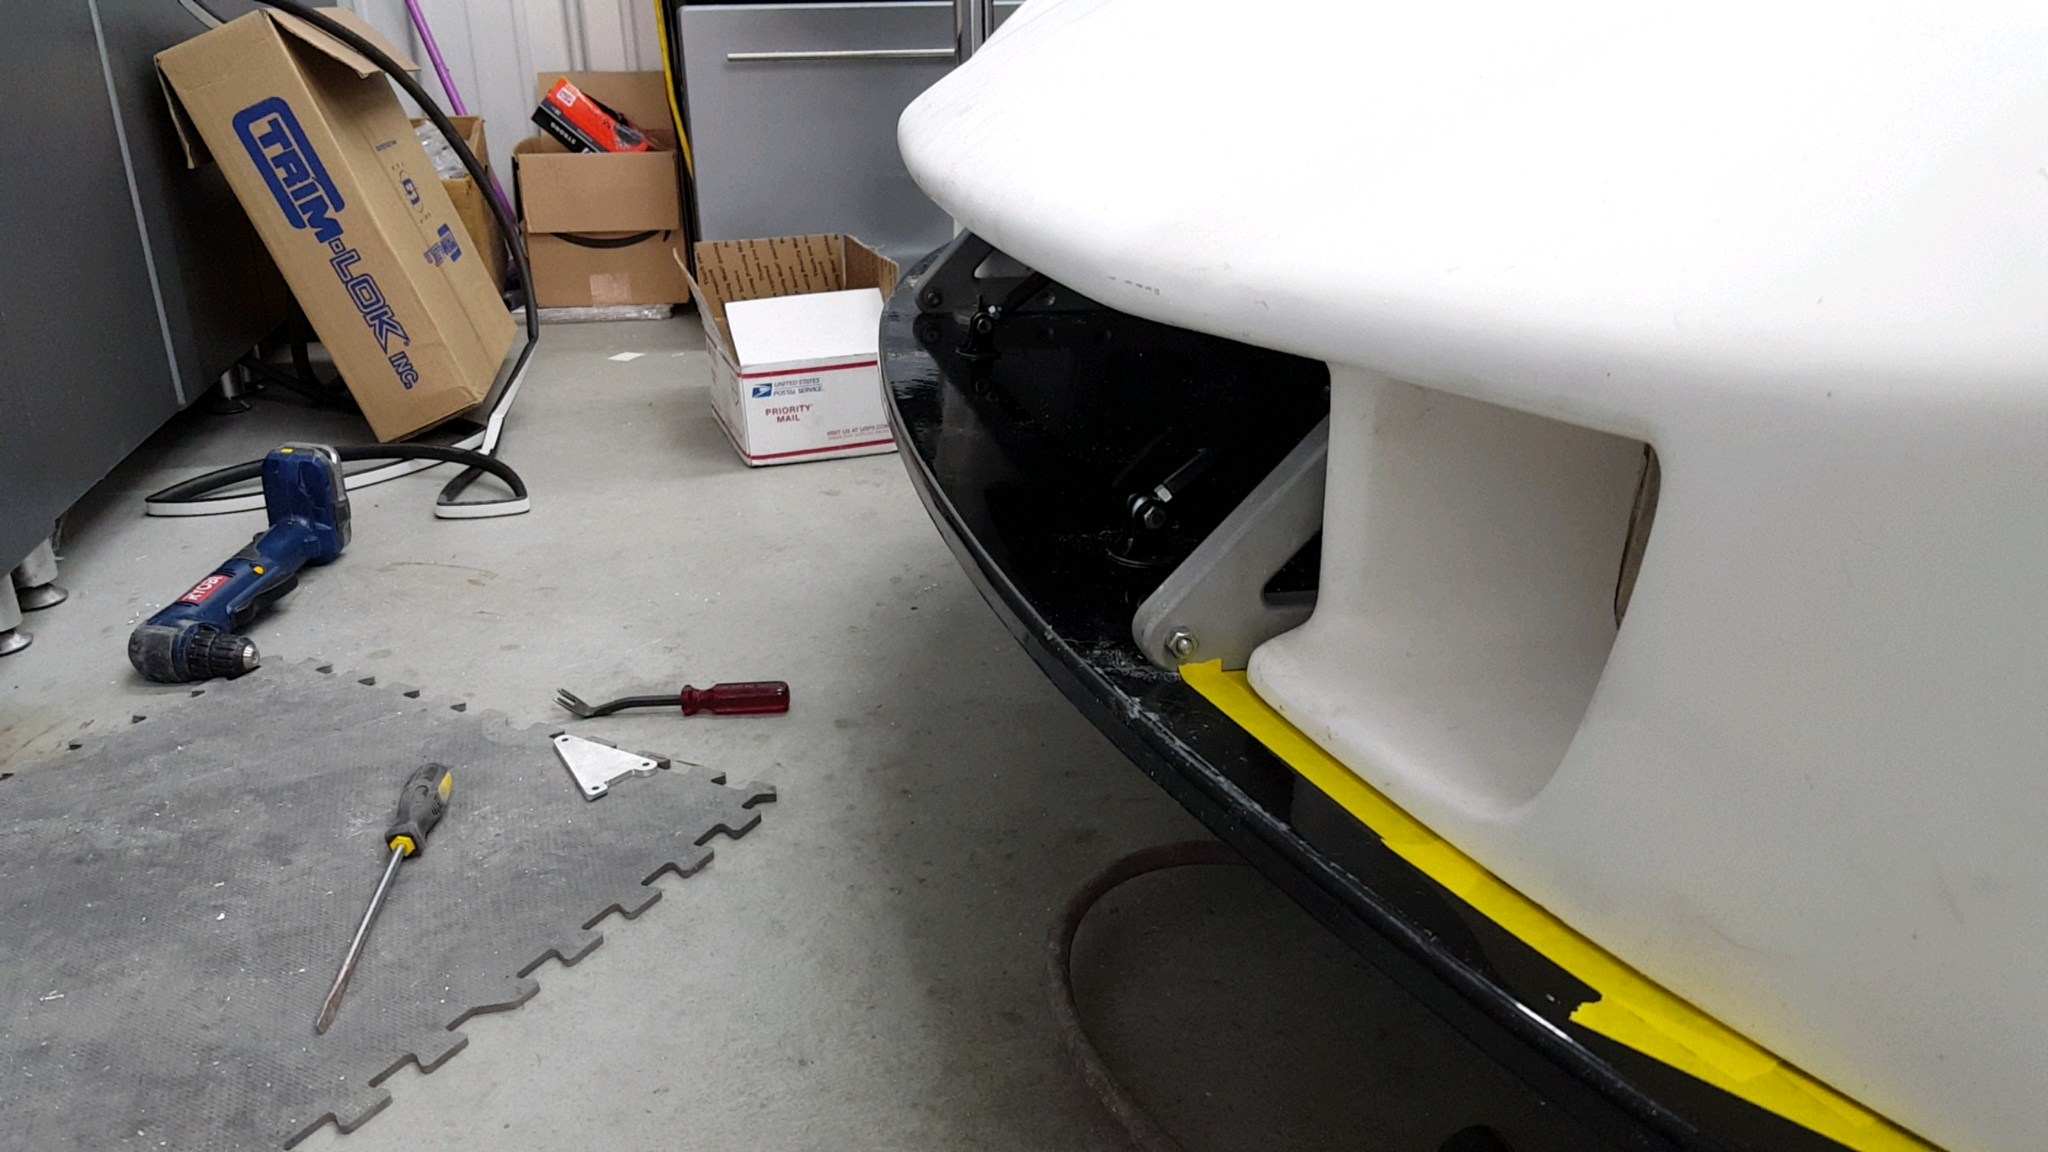
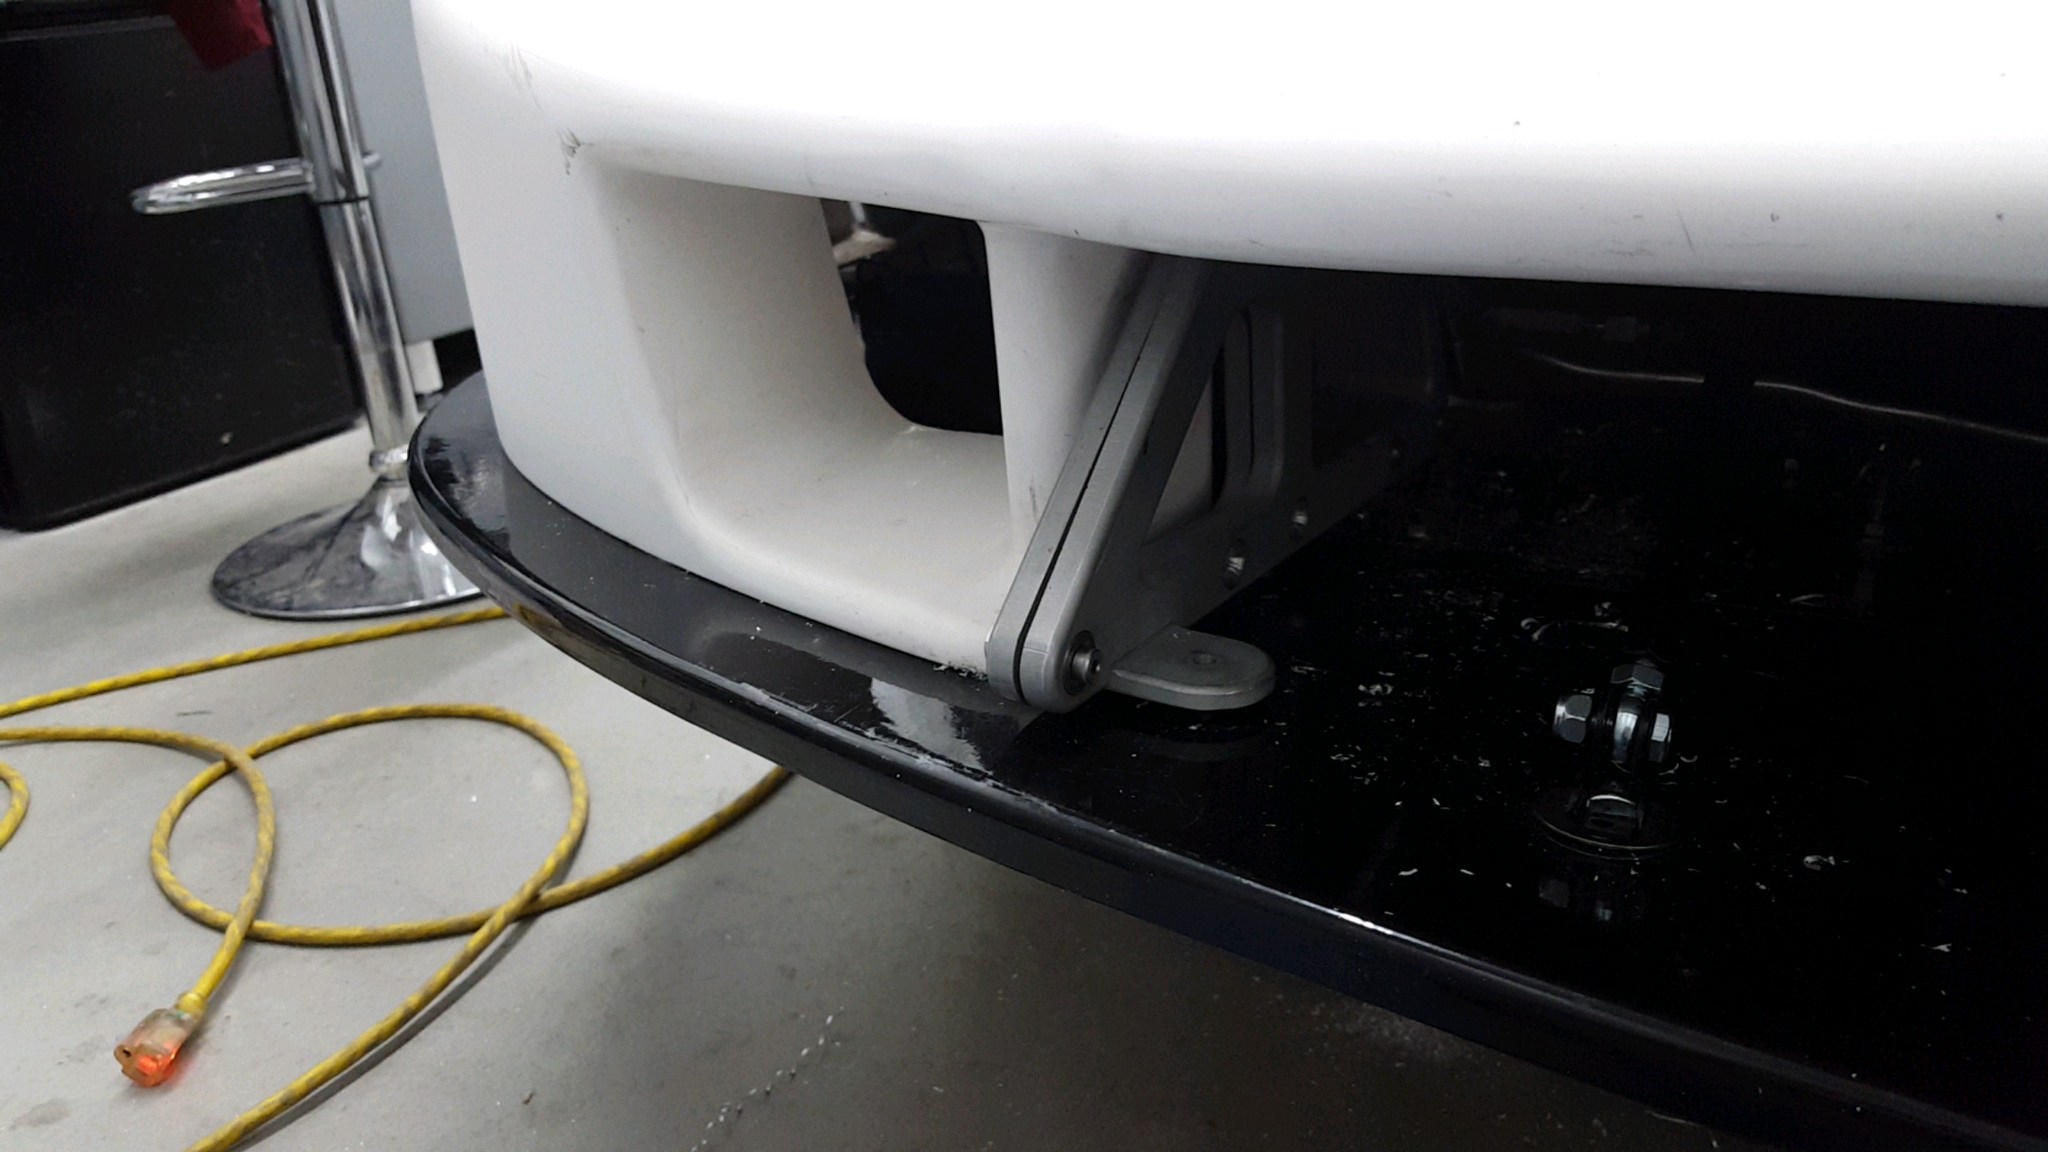
What’s needed is a nose hinge. The primary challenge with designing the hinge is that the splitter, as is appropriate for a performance car, projects in front of the body work. Since the nose pivots forward its leading edge will bind on the splitter unless the pivot point is low and in front of the bottom edge of the nose. There are three general approaches that have successfully been used on SL-Cs, each with pros and cons.

Compound Hinge

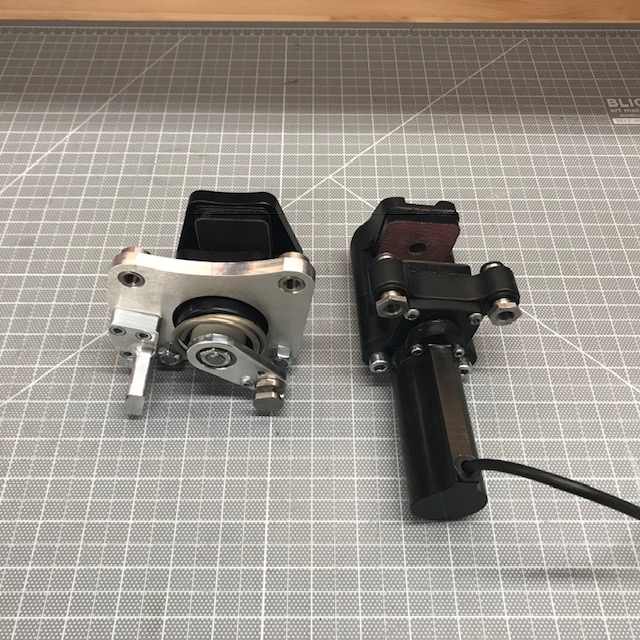
A compound hinge raises the nose before allowing it to pivot forward. While there are many nice billet aftermarket versions available, they are generally designed for hoods which are lighter and they likely don’t have optimal geometry. Pros: Least visible when the nose is closed; may have integral gas spring; retains the splitter support rods. Cons: The motion isn’t as smooth as a single pivot point; the nose is wobblier when open; separate pull pins are required to lock the nose in place; and the nose may chafe on the splitter.

Forward Pivot Point

By placing the pivot point in front of the body it clears the splitter. Pros: Smooth motion, retains the splitter support rods; pull pins not required, easiest option to remove the nose (the bolts are outside the body!). Cons: Most visible (it protrudes in front of the nose); nose may chafe on the splitter; most difficult to implement (with a kit, it’s the easiest) .

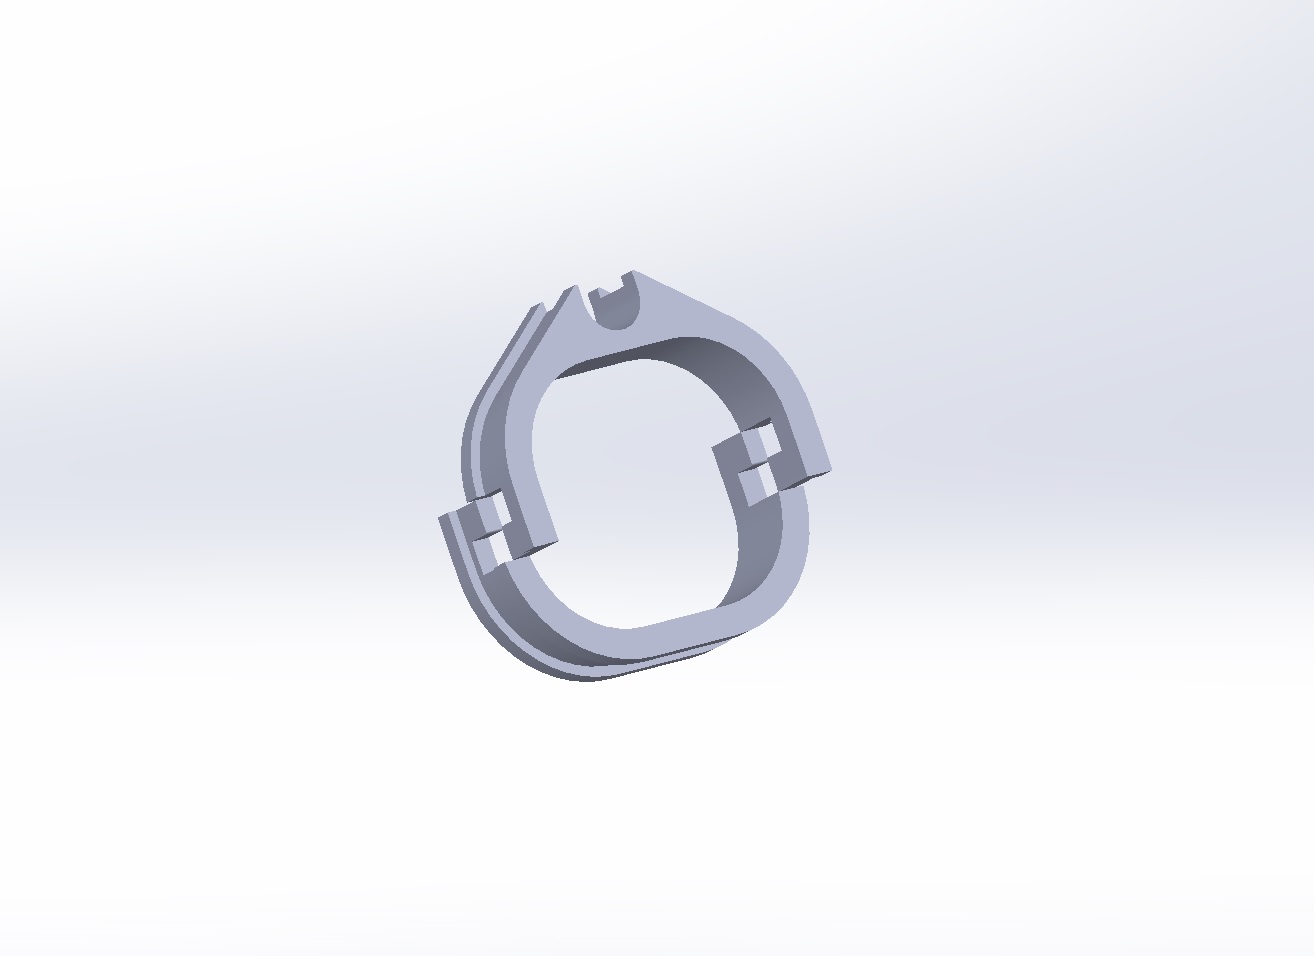
Recessed Pivot Point with Rotating Splitter

The nose is attached to the diffuser and the pivot point is placed inside of the body. Pros: Smooth motion, splitter is strengthened, nose won’t chafe on splitter. Cons: All splitter and nose forces are supported by two pivot points mounted in fiberglass, the splitter support rods are removed (Fran doesn’t recommenced doing this for car that will see high speeds), heat exchangers can’t be mounted to the diffuser, more difficult to implement brake duct hoses.

Approach

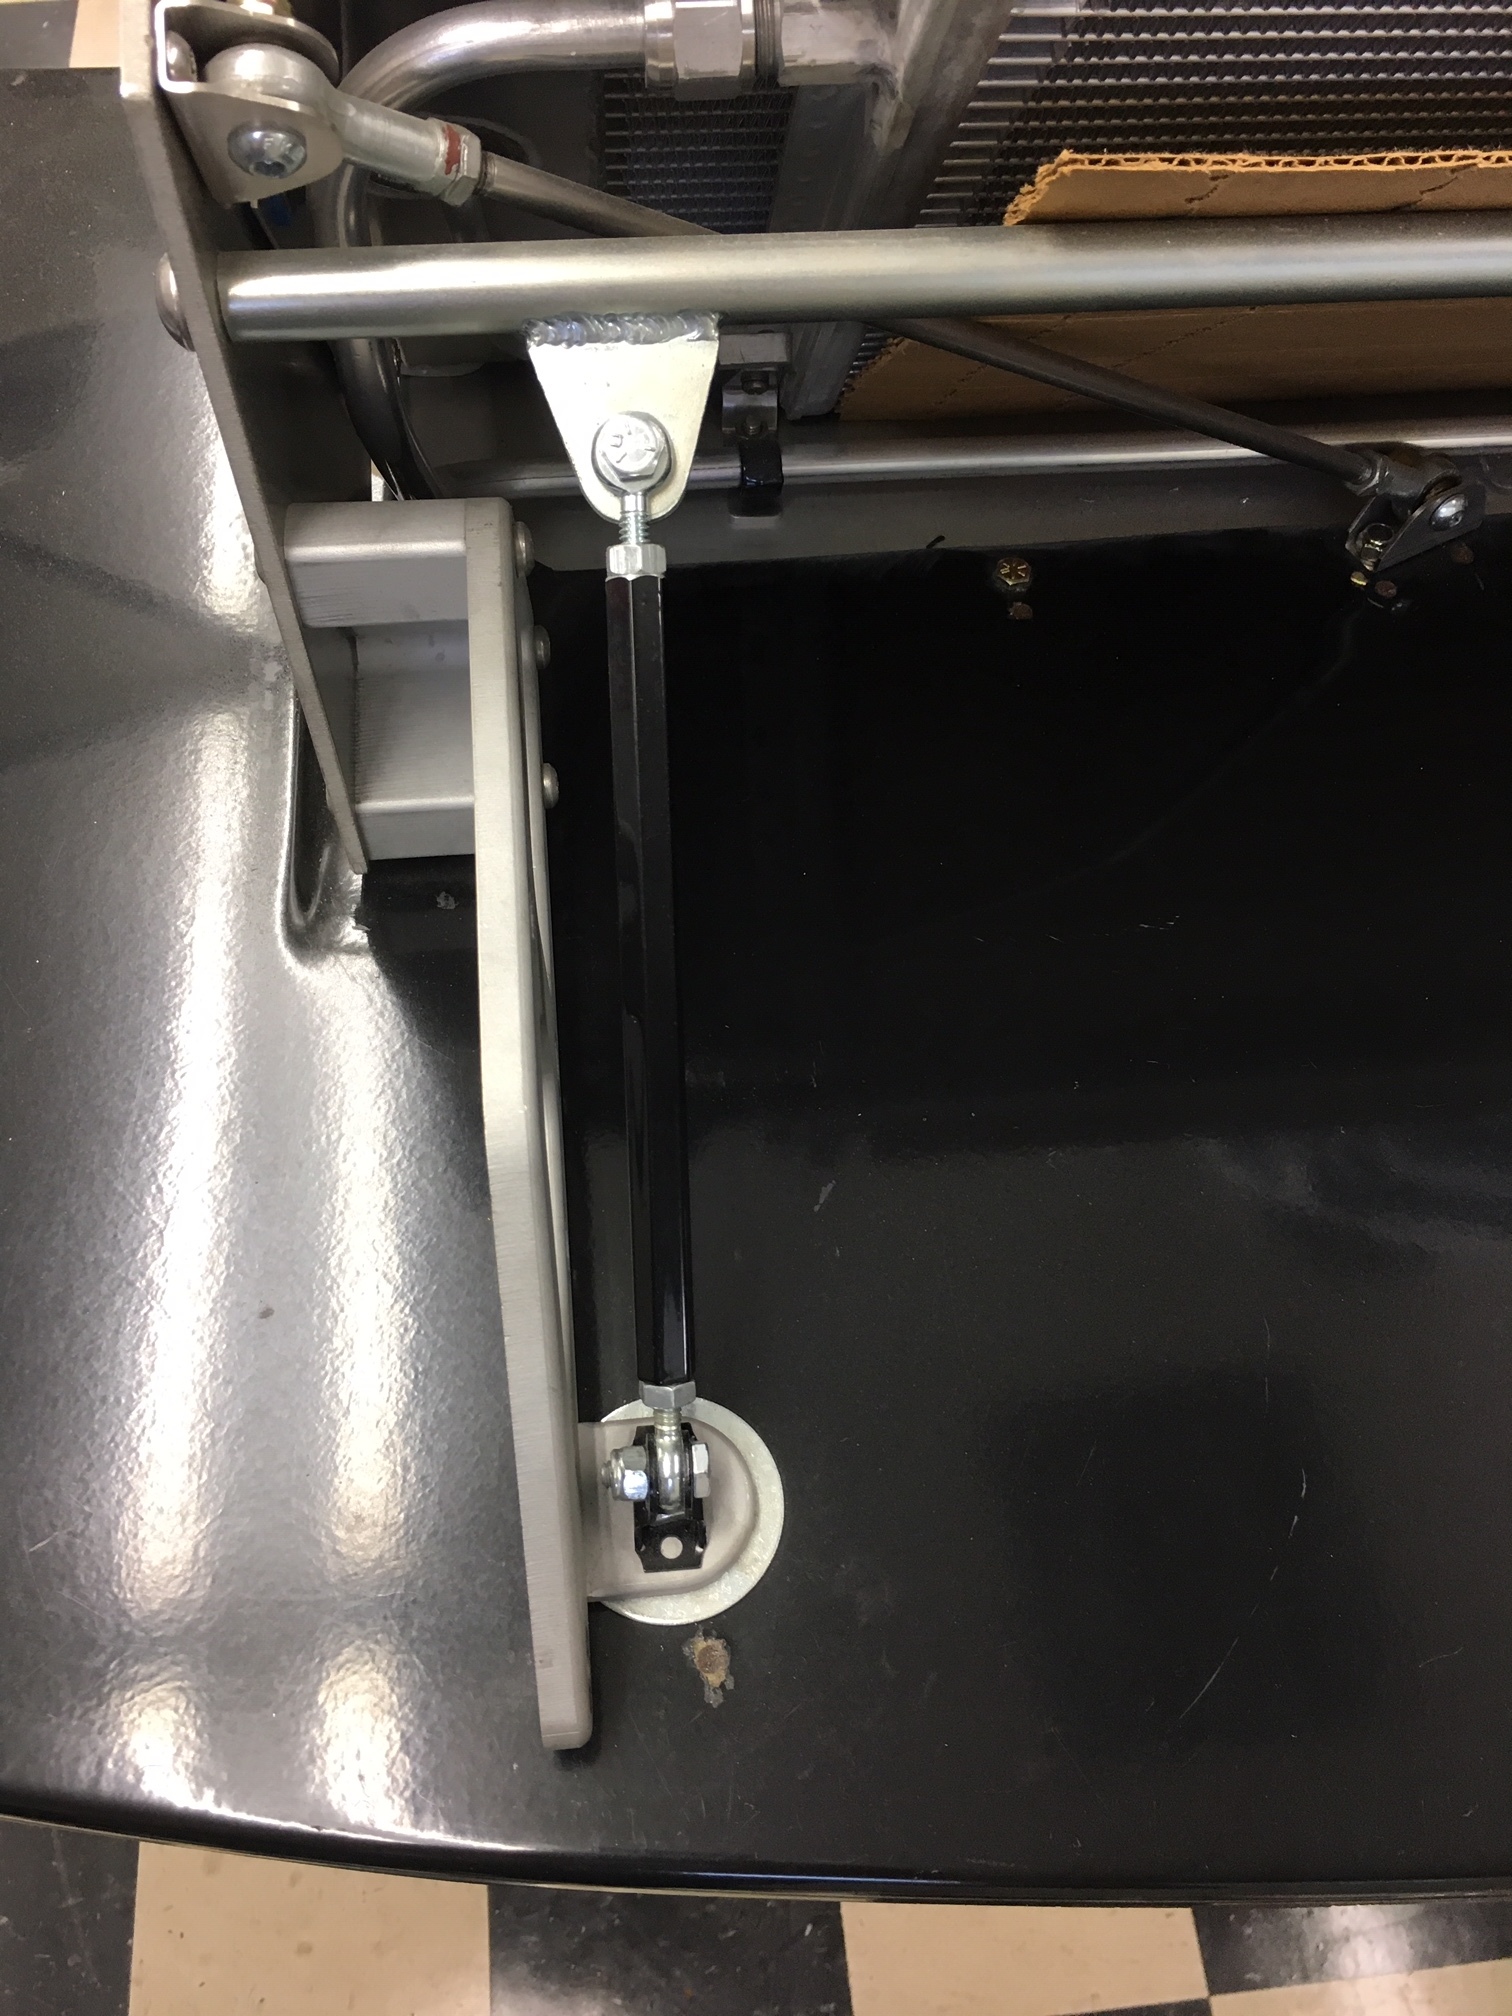
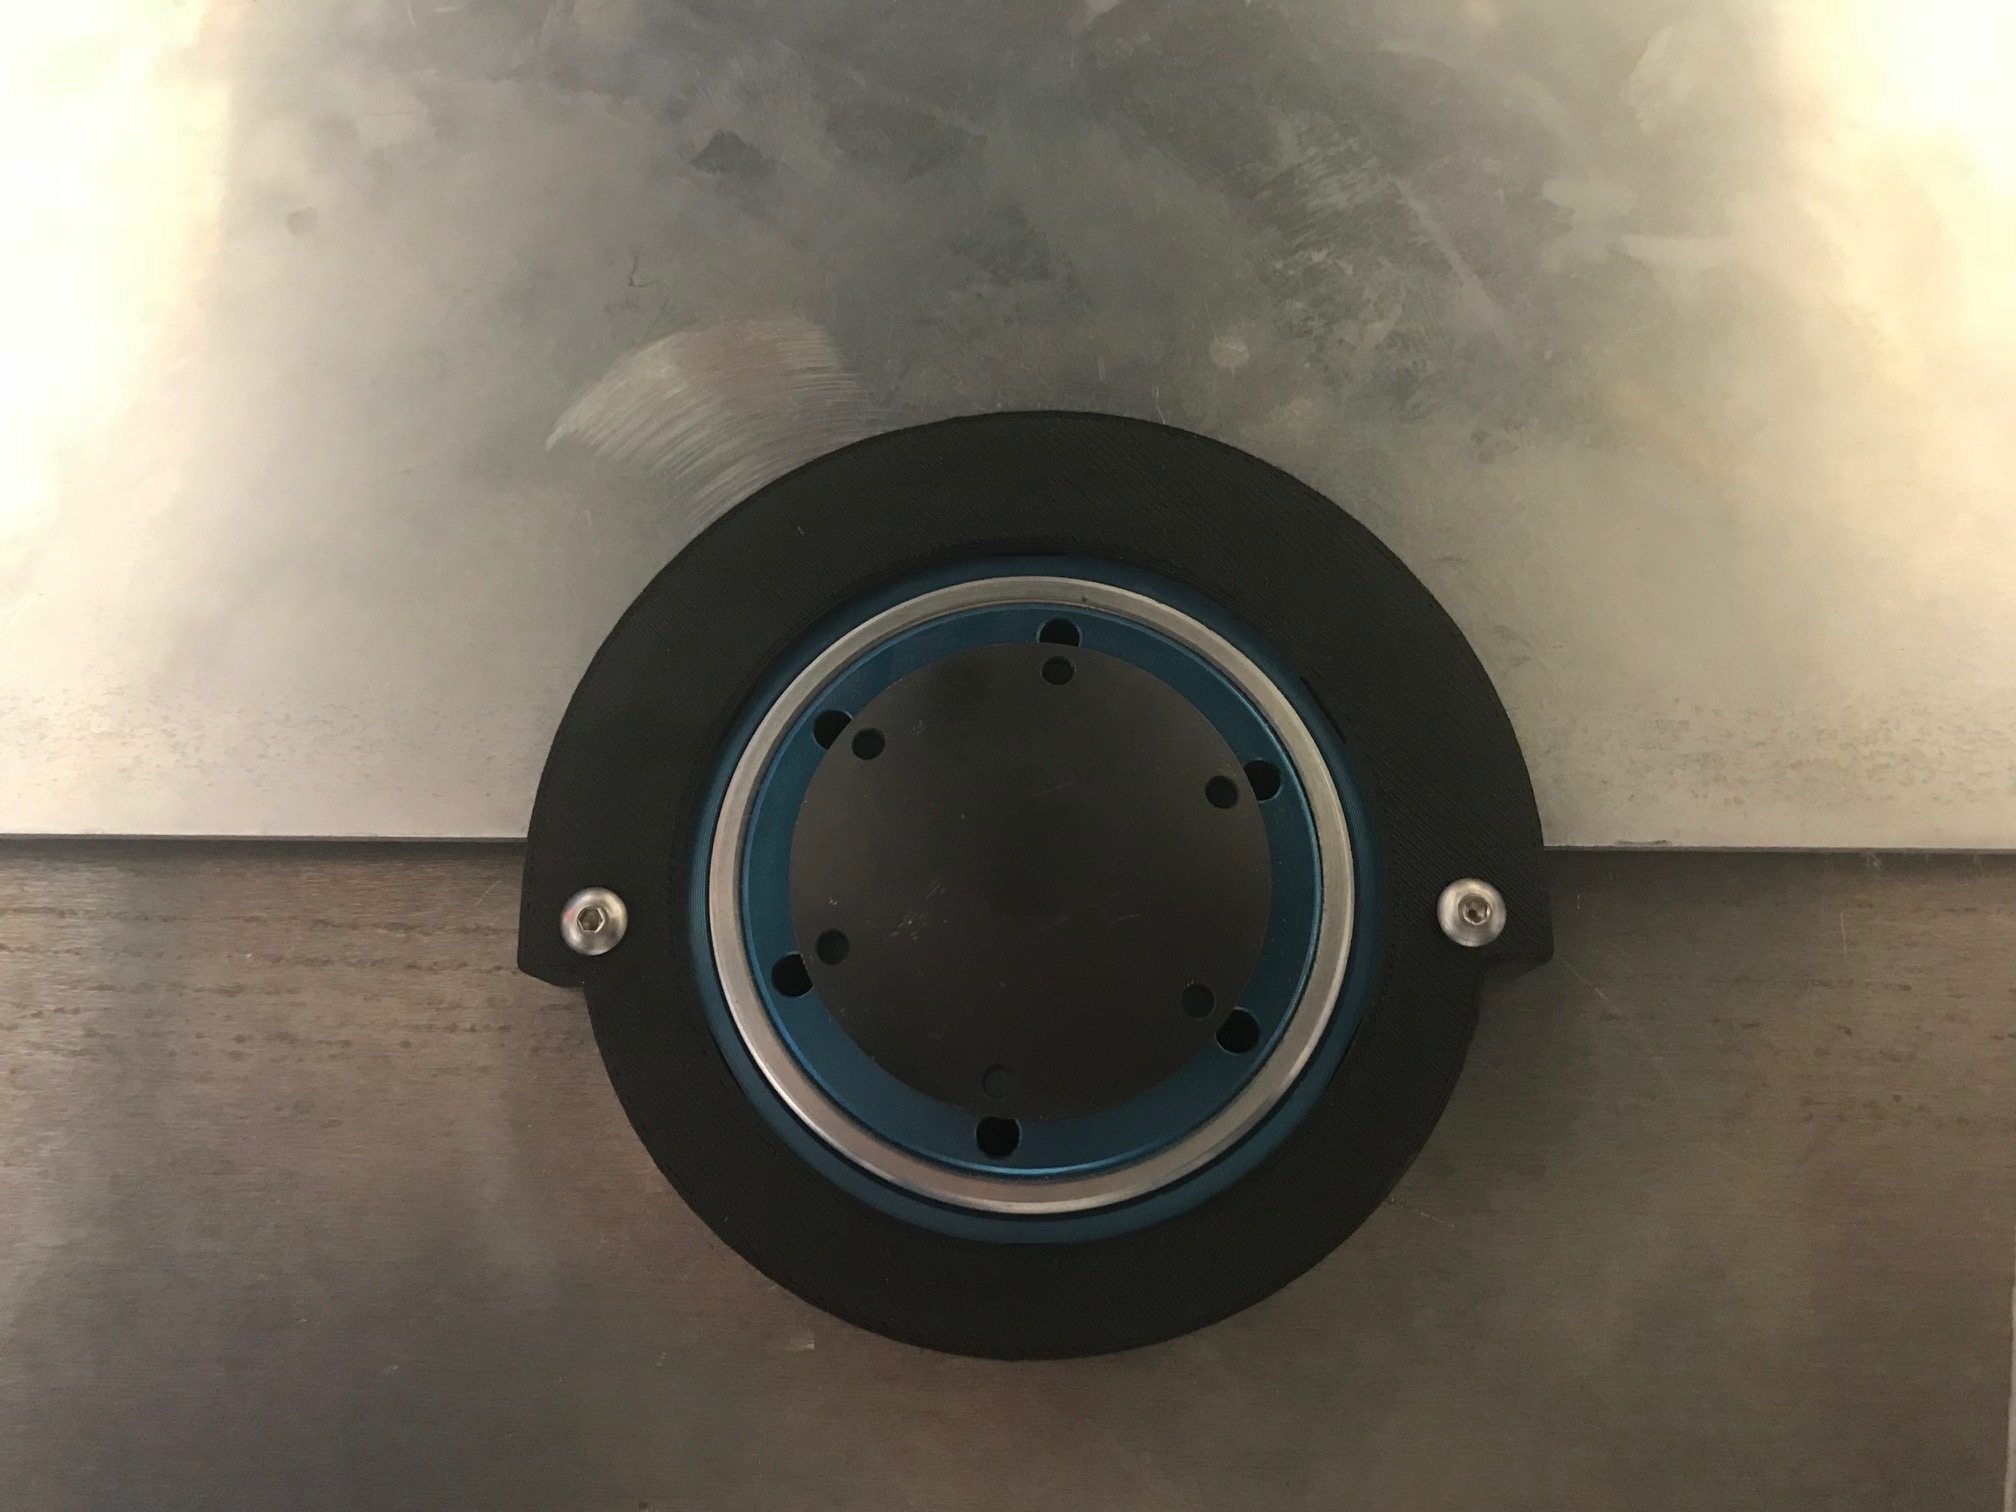
I decided to go with the Forward Pivot Point approach because it offers smooth motion and allows me to mount the supercharger’s heat exchangers on the splitter. While noodling on the on the problem I discovered that Bob, another SL-C builder, had built a working prototype. The following video demonstrates how easy the nose is to open when gas struts are installed.

Bob shipped the prototypes to me and I tweaked and redrew them in SolidWorks. I then sent them to Allan and he installed them on a SL-C that he’s building (see picutres below). Based on Allan’s feedback, I relocated a few of the mounting holes.

The following video shows the updated CAD model. The plan is to do a group buy. The two largest pieces have left/right mirrors, so they take twice as long to achieve volume pricing as the other pieces. The target is to have a minimum order of at least ten hinge sets. Here are the top-level features:

  • Billet 6061 aluminum

  • Arms are 3/8” thick

  • All hardware, other than gas struts, is supplied

  • Stainless Steel mounting hardware from McMaster

  • Steel ball bearings from McMaster

  • Steel drilling jig

Depending on the shipping costs, we may or may not provide the gas springs.

We’re currently looking for someone to machine it!


Happy New Years!

I guess I should share a couple of resolutions. First and foremost I’m going to lose a lot of weight. In addition to health benefits, I’d need the world’s largest shoe horn to squeeze me into the car and even then NFW would I’d fit into the Tillet B5 seats. I’m also pushing to fire up the engine this year. That’s a lot of weight and a lot of work from where I am today!

The next step was to bench test the parking brake. Wiring it was trivial. You simply power it on a 10-amp circuit and plug in the ECU, calipers and switch. The results were anti climatic to say the least. As you can see in the video below, I hold the button for the requisite two seconds and the motors whirl and quickly stop. The LED on the button indicates that the brake is set, but it's clear that the brake pad is nowhere near the caliper. In fact it has moved less than 0.5 mm. Holding the button causes motors to return the calipers to their open position and the LED goes out indicating that parking brake is no longer set.

I’ve learned this lesson before… test everything as soon as you get it, because it often doesn’t work and if you discover this when you really need it, you’re going to lose a lot of time. So, back to England it went and it’s been help up in customs for 11 days.

So, on to the cooling system. To mount the 1-1/2” stainless steel cooling tubes I ordered some 1-3/4” billet clamps and lined their ID with 1/8” self-adhesive rubber to reduce conductive heat transfer. To reduce noise I covered the bottom of the side pods with Second Skin Damplifier Pro (I didn’t cover the vertical 2” x 6” because horizontal space is tight). I then covered the bottom of the side pods and the vertical 2” x 6” with DEI Tunnel Shield II to reduce heat radiation.

Zero-flute countersink

I mounted the clamps to the bottom of the side pod. To keep the underside of the car as smooth as possible I used flat-head screws which provided an opportunity to use one of my new zero-flute counter sinks. Wow, these cut so much smoother than the fluted ones.

The next step is to fabricate and weld the 1-1/2” tubes from the radiator to the engine compartment.

Parking Brake P2

I finally received the e-brake system for HiSpec. It seems to be well built and I was happy to see a quality assurance tag (see picture below) on the harness indicating when and by whom it was tested. The top of the ECU housing appears to be anodized cast aluminum with the backside potted with epoxy to encapsulate the electronics. The included button has an LED to indicate if the brake is engaged or not. It’s useful if you want to hide it or if you’re going with a race car interior, but I’m likely going to upgrade it.

The following photos compare the Superlite caliper (left) to the HiSpec caliper (right).

I expected the overall HiSpec system to be lighter, but I expected the calipers to be heavier due to the integral motor. I’m thrilled that the HiSpec solution has lighter calipers which results in lower unsprung weight. The following table lays out the weight for three different parking brake scenarios.

Part UnSprung Hispec Superlite Superlite & E-Stopp
Calipers Y 5.7 6.5 6.5
Caliper Brackets Y 1.0 1.0 1.0
ECU & Wiring Harness N 1.4 n/a 0.5
Handle N n/a 1.1 n/a
Handle Brackets N n/a 3.0 n/a
Cables N n/a 3.5 3.5
Actuator N n/a n/a 4.8
Total Unsprung Weight - 6.7 7.5 7.5
Total Weight - 8.1 15.1 16.3

There are three features to prevent accidental engagement/disengagement:

  • The button must be held for two seconds

  • An optional wheel speed input to prevent activation when moving

  • An optional ignition input to prevent deactivation

I spent a while trying to figure out how to mount the calipers. In particular I couldn’t figure out what the snap spring was for… at some point Bob pointed out to me that it’s a floating caliper design. Duh, that explains a lot! The caliper can slide (i.e. float) 0.35” towards/away from the rotor. I figured it would would be best to place it in the middle. While mocking the bracket I was constantly measuring and re-centering the caliper. I then figured out it would be easy to 3D print two temporary spacers to keep the caliper centered.

The rotors are 28 mm wide (1.1”) and the space between the pads is 1.2”. To ensure that the pads were perfectly spaced on the rotor I tried using some metal shims, but they weren’t the exact width that I wanted and they kept falling to the floor. So guess what? I 3D printed two brake pad spacers the prefect width and with a right angle to keep them from falling. The openings in the brake pad spacers aren’t for style points. They significantly reduce print time and the amount of material used. This is the exact opposite of CNC machining in which this would increase machining time.

Since the hydraulic brake caliper is at 3 o’clock I placed the parking brake caliper at 9 o’clock. While mocking the bracket I figured out that it’s critical to locate it in exactly the 9 o’clock position. Otherwise I would will get different fitment due to the curvature of the rotor and the shape of the upright (it’s sloped -15 degrees from vertical). I tried to do everything on the car, but after a couple of misses I decided to pull the upright… I hate removing ball joints. I think I’m going to put some anti-seize on them when I reassemble!

Rear left upright, the line scribed in the blue dye is the 9 o’clock position (when looking from the other side)

The Superlite bracket requires you to drill holes in the the side of the upright which has machined pockets behind it (i.e., the recesses above and below the 9 o’clock position in the picture above). This area is 0.3” thick which is only 0.95x the diameter of a M10 bolt which is well under the 2x rule of thumb for thread depth in aluminum. Given that the parking bracket doesn’t see much stress and that any stress puts one screw in compression and the other in tension this isn’t an issue. That said, it doesn’t feel right to put the screws there. In any event, the HiSpec caliper results in a bracket that places the screws towards the center of the upright. After careful measuring, it appears that the holes can be placed in the web between the machined pockets on both sides (see picture below). I would like to confirm the 0.934” dimension with Superlite before drilling!

Horizontal cross sections of the Superlite and new brackets

A bunch of iterations I wound up with the following bracket. This could be made from a 3/8” angle aluminum, but the Superlite bracket is machined from billet. If we’re going to machine it, we might as well give it some pockets to make it a little more like the upright!


To hold the mock bracket in place and ensure that it was parallel to the upright’s edge I used a piece of 1/4” scrap aluminum (yeah, that’s not bending). I wanted to position the bracket inboard of the upright’s chamfer so I used some scrap 1/8” aluminum to make a spacer and lined everything up using a centerline groove I designed into the mock bracket.

In the picture below you will note that the rotor’s OD is parallel with the edge of the parking brake’s pad. This leaves approximately 1/8” between the rotor’s OD and the caliper’s ID. You will also note that the caliper isn’t exactly centered on the caliper pin (or whatever it’s called).

The following picture shows an outline of the bracket and where and how deep the threaded holes will go to achieve 2x screw diameter (i.e., 20 mm).

Next step is to wire it up and test it. Apparently you need both calipers plugged into the ECU for it work.


Scale Model

families-ambition-ambitious-emotional_needs-pushy_parents-ambitious_parents-cman259_low.jpg

My blog aspirations took a major hit last week when my mom unsubscribed. Apparently my content was mundane and deleting the occasional email notification was a burden. She claims that it was an accident, but I have my doubts — my therapist is on the fence as to her real motivation:-)

At least when I didn’t like her liquid-margin-covered, boiled brussel sprouts I just hid them in a napkin! In any event, I’m now free to openly confess that I abhor boiled brussel sprouts, but I actually like properly-seasoned broiled brussel sprouts and I adore Kentucky Fried Chicken (don’t tell her).

So, in the spirit of more interesting content I thought I’d share a video that Kevin made about 3D printing a model of my car. As you might recall he’s designing the new tail and he wanted to see what it looked like in real-D. He makes some great points on how to optimize orientation to reduce print time and material wasted on support structure while also improving print quality.

Control Arm Clip

I needed to attach the hydraulic line for the front lift to the lower control arm. A zip tie looked a little naked and I didn’t want to use a P-clip because I’d have to drill and tap the control arm. So I decided to design one. My initial thought was to make something with a snap hinge, but that made it too bulky and not as durable as a zip tie. I wound up with two pieces that snap together on the control arm and have a recessed channel for a zip tie.

Parking Brake

I purchased the option parking brake kit from Superlite. Although it provides all of the key components the builder still needs to fabricate a custom bracket for the brake lever and route the cables to the calipers on the rear wheels. While this isn’t complicated, it’s a pain in the ass. My biggest issue was trying to figure out where to locate the lever in the cramped cockpit. This is why many builders replace the lever with an E-Stopp electric brake kit. Essentially it’s a linear actuator with an Electronic Control Unit (ECU) that utilizes a button to toggle between no tension (brake off ) and 600 pounds of tension (brake on). The unit is used in many hot rods and SL-Cs. Most SL-C builders mount the unit in one of the side pods. The issue with this location is that you have to take the body off to service it.

I spent a lot of time thinking about where to place the E-Stopp and one of Stephen’s forum posts provided the answer. He mounted the unit in the recessed floor which affords easy access for maintenance. I was already planning on creating a closeout panel that wrapped around the chair to create a flat floor. I figured it would be a great place for luggage. I figured I could could fit a T-shirt, boxers, socks and toothbrush is a Ziploc bag LOL. Stephen also fabricated a channel to protect the cables… brilliant!

So that was the plan until I spoke with Allan and Bob. Allan has successfully used the E-Stopp in multiple cars, but he’s had two cars in which he couldn’t reliably get the parking brake to hold. He called the manufacturer to see if he could increase the 600-pound tension and they indicated that they’d have to completely redesign the unit. Bob also had similar issues and his car let loose while on a trailer. He spent a fair amount of time trying to get it to work reliably to no avail. While many people have had success with the E-Stopp, two very talented builders have had issues with it while the car was in the build stage.

Back to the drawing board. I then discovered motor-on-caliper parking brakes. Instead of using a cable to actuate the caliper these systems utilize an ECU to drive motors that are directly attached to the calipers. Apparently TRW has shipped over 60 million units and Brembo and other manufacturers have integrated the motor directly into the hydraulic caliper. This reduces unsprung weight by removing the need for a separate caliper and bracket. It’s my understanding that some systems implement a true emergency brake by using accelerometers to ensure that the car doesn’t spin when the brake is applied.

The TRW looked like an ideal solution. I tried to buy an aftermarket version or at least get documentation on an OEM version to no avail. So to the junk yard I went. It’s easy to pull the calipers and ECU, but I couldn’t figure out how to activate them. I tried using a CAN bus sniffer on a running car to figure which CAN bus messages where used to activate and deactivate the brake. My conclusion was that that the e-brake ECU are typically deeply integrated into the OEM’s system and that it wasn’t going to be as easy as finding two messages and broadcasting them. There’s likely a OEM implementation out there that might be that simple, but god knows how long it would take to find.

So after over a year of intermittent researching and tinkering I ordered an E-Stopp. On the day it arrived I decided to do one final search before opening the box and installing it following Stephen’s method…. AND I found this… HiSpec Motorsport Spot Electric Parking Brake (EPB) Really?

It’s a standalone solution that includes two calipers and an ECU! To prevent accidental engagement/disengagement you need to hold the button down for two seconds. The harness enables the addition of a backlit button or LED to indicate when the brake is engaged. My understanding is that it has adjustable tension and that it’s capable of holding a mid-size truck (will get specs from Hispec). At £640.00 (~$835.00) they’re a good value given that the Superlite option costs $999 and an E-Stopp costs $479.00. I asked them the weight of the caliper/pads/motor and I’m pretty sure they said 1.2kg (2.6 pounds). I weighed the Superlite brake caliper and it was 3.2 pounds. I had assumed the the Hispec unit would have lower total weight, but a higher unsprung weight due to the motor being mounted to the caliper. It seems too good to be true so I’ll validate the weight when it arrives.

So the benefits appear to be:

  • Significantly cleaner and easier installation

  • Lower total weight

  • Lower unsprung weight

  • Lower cost

  • Better holding power

The only downside that I can think of how to release the brake if the system fails or power is lost. They quote 28 days to manufacture the units after which point they are shipped from the UK. The next steps are:

  • Weigh the unit

  • 3D print a prototype bracket. This bracket will also double as a drilling jig. I will have tabs that enable it to be clamped to the upright and drill bushings to ensure straight holes.

  • Mount and test using the prototype brackets

  • Determine how to manually disengage the brakes

  • See if Fran is interested in selling CNC’d brackets

Front Sway Bar Drop Links

I fabricated drop links to connect the front sway bar to the lower control arms. The drop link was fabricated by cutting 5/8” aluminum hex bar to length and using a lathe to remove the corners (i.e. make round) the entire length other than 0.6” on each end. The hex on the end enables a wrench to turn the link and the round section lightens the link… plus it looks trick. The ends were then tapped and drilled for 3/8”-24 Heim joints. One end is a right-hand thread and the other end is a left-hand thread. This is done so that when the link is rotated clockwise both ends expand and when the link is rotated counterclockwise both ends retract. If both ends had the same thread, rotating the link would have no effect. One end would expand and the other would contract by the same amount. I tapped the holes 1.2” deep to accommodate the entire shaft of the Heim joint. These were by far the deepest holes I’ve ever tapped and they took longer than I thought to complete. I also had to buy a new tap because I had never tapped a left-handed hole.

The Heim joint fit perfectly in the clevis. This makes sense because the clevis can be rotated so that its open ends are aligned with the Heim joint’s body (i.e., no binding issues). However, the mount in the sway bar arm is 3/4” and the only Heim joints that I could find were 1/2” wide. Since this joint will see some misalignment I didn’t want to use washers to make up the difference. I spent some time looking for 1/8” cone washers until I realized that they would be too thin to do much which is probably why nobody make them.

At that point “H” suggested that I look for high-misalignment Heim joints and I found one that was 0.875” wide. I made a jig out of some angle aluminum and a 3/8” bolt to keep everything square when removing 0.0625” (i.e. 1/16”) from each end on the sander. Apparently I can’t tap a perfectly straight hole (even after a couple of tries), so I used two nuts to lock everything in place ;-)

The lower control arm was drilled to mount a clevis. It would have be a lot easier to drill this hole on a drill press rather than when the control arm was mounted to the car, but I didn’t want to take apart the front suspension again. I used a drilling jig to ensure that the hole was square.

I also had to cut all of the grade 8 bolts for clearance reasons.

Air Jack Mounting Ring Lock

I designed and 3D printed a locking ring to prevent the air jack mounting rings from loosening. They don’t take any force so a 6-32 screw was used to keep them from rotating.

In the last post I notched the removable floor in the nose to clear the front floor jack. I created a 360-degree lock that spans the gap between the mounting ring and the floor to reduce drag… oh, and it just happens to hide my less than perfect notch ;-)

Getting Jacked

arnold-schwarznegger-perfection.jpg

I’ve been working hard to get jacked — don’t worry, I’m not taking roids or considering wearing a mankini.

Instead, I’ve been busy working on an air jack system. The hydraulic lift discussed in a previous post raises the nose to handle speed bumps or steep inclines. This system raises all four wheels off of the ground. Since I’m not going to do any endurance racing I have no rational need for it. However, this is my halo car so do it I must. I’m trying to talk my wife and kids into be my pit crew…

The write up and lots of pictures can be found here.

Cone Washers

Heim Joint.png

The suspension uses 36 Heim joints (a.k.a., spherical rod ends or rose joints). For 28 of those instances Superlite provides two aluminum cone washers and four grade 8 washers to mount each Heim joint (see the "Before" picture below). The cone washers allow the ball to rotate to a large angle without the case binding in the mounting bracket and the grade 8 washers take up the remaining space between the cone washer and the mounting bracket.

It's a simple but exasperating process to get everything lined up so that you can slide the bolt through, particularly if you're doing it by yourself. The bolt is a tight fit in the bracket and ball swivel holes (a good thing) and the diameters of the grade 8 and cone washers are different. 

I've taken these assemblies apart many times and I finally decided to improve things. I had Agile Automotive Performance make a set of custom cone washers. They have the following benefits:

  • They're a dream to install, no %@#! profanity required
  • They look great
  • They're a lot lighter
  • They allow the ball to rotate to a greater angle without binding; I'm not sure if that's useful in my case, but it certainly doesn't hurt

The weights in grams of the before and after assemblies are as follows:

  • 5/8" bolt: 80 vs. 10
  • 1/2" bolt: 46 vs. 12

So what does that amount to for the whole car? Approximately 2,096 grams (4.6 pounds) which is negligible. That said, the primary reason I made the change was to make assembly easy.

Accessory Pulley

On the dyno the belt driving the super charger and water pump starts to slip at 950ish HP. Adding the alternator and A/C compressor would only make that situation worst. After a lot of thought, I decided the best approach would be to mount a custom 6-groove pulley to the face of the crankshaft damper and run a second serpintine system. This is going to make things very tight and require custom brackets for both the alternator and the A/C compressor, but it seems like the best approach -- time will tell.

I spent a lot of time searching for "custom billet pulley" and found lots of companies making beautiful pulleys, but all that I spoke with are focused on products and not one-off pulleys. Anyone with a CNC lathe can make one, but I wasn't sure of the profile of the ribs. I eventually found ASP Racing and they were great to deal with.

The diameter was optimized for the A/C compressor because that A/C compressor doesn't work well at low RPM and running it too fast will damage it. In addition, unlike the pulley on the alternator which can be easily changed, the compressor pulley has an integral clutch which means that it can't be changed.

Here are the final specs:

  • 6 grooves
  • 6-1/4” diameter
  • Concentric locating flange machined to fit inside the damper’s 2.050 ID.
  • 3 bolt holes for 3/8” bolts on a 3.2” hole pattern
  • Clear anodized machined finish

The next step is to pull the engine and design the custom brackets and serpentine system.

Low-Pressure Fuel System

I spent a lot of time thinking about the low-pressure fuel system. My primary objectives were:

  • Fit everything in the space next to the fuel tank
  • No "hard-turn" 90-degree bends (i.e., only swept 90s)
  • Gravity feed the lift pump; pump inlet 2" lower the fuel tank outlet
  • Ability to remove the filter element by removing a single hose connection
  • Easy serviceability of filter, pump and all connections
  • Fuel shut-off valve accessible in engine compartment

Fuel Pump and Bracket

The fuel pump bracket was made with 1/4" x 4" x 4" angle aluminum. I milled a rectangular opening and drilled a circular one to reduce weight. I also designed and printed a spacer because the pump was too tall for the bracket (a 5" piece would have obviated the need for this). While the pump's mount is coated in rubber, I also created a 1/16" rubber gasket to go under the spacer to further improve vibration isolation.

Hard Line

It was too tight to get the flex hoses to make the bend between the shutoff valve and the filter so I made a custom "hard line" out of 1/2" aluminum tube. Fortunately I only needed a single 90-degree bend which is a simple to do with a tube bender. I then needed to put a single 37-degree flare on each end of the tube. It took a couple of tries to get it right but it came out perfect. On my second attempt I had the perfect length, perfect bend and perfect flares, but I forgot to put the tube sleeve and tube nut on BEFORE making the flare – Do'h, another do over. Here's the top-level steps:

Access panel

I decided to cut a hole in the floor for an access hole. The first step was to lay out the opening from the inside of the car. I maximized the opening, but I left a 1/4" lip to clear the weld beads (they're really hard and not fun to cut or drill). I used a 1" diameter annular cutter to drill the four corners from inside the car. I then used a jigsaw to cut the hole from the underside of the car.  

The removable panel was made from 0.1” x 12.25” x 8.5” aluminum. To make it easy to remove/install the panel, I decided to use Dzus connectors. Rather than attempt to cut the Dzus profile and holes in the floor I used pre-made Dzus weld plate spring receptacles. Since you can't weld steel to aluminum I simply drilled and tapped the chassis for screws to fasten them. To make up the space between the panel and the fastener I designed and 3D printed some spacers. The spring heights were a little off, so I used a spring height adjust tool below to stretch them a little. This is a lot better than doing it with needle nose pliers.

I wanted to be able to replace the filter element and only need to disconnect one hose connection (rather than disconnecting both ends of the filter and removing the entire assembly). To accomplish this, I tilted the filter bracket downward and ground off the 1/4" lip on the floor so that the filter would clear. WOW, did that make a mess. I had metal chips everywhere. It's a close fit, but it works.

Fuel Shut-Off Valve

I wanted the fuel shut-off valve to be accessible from the engine compartment. To do that, I needed to extend the shaft so that it would pass through the close out panel. I bought a valve from Peterson which is beautifully machined. However, I really didn't like how they implemented the full-open and full-closed stops. When the handle isn't attached, the shaft can be continuously rotated in either direction. As you can see in the picture below, a screw is used to tighten the handle on a round shaft. The full-stop positions are implemented via a fixed pin on the housing which fits into a slot that's machined into the handle. If the handle slips the full-stop positions will be off. While not the end of the world, I went to a lot of trouble to have no restrictions and there is no easy way to know if things are lined up (i.e., full open) once installed.

There must be a better solution. After doing research, I found one from Speedflow. It's not as cool as Peterson's, but the stops are cast into the body and it has a hex shaft which prevents the handle from rotationally slipping. I loosened the screw and was surprised that I couldn't remove the handle. This is because the screw passes through a groove in the shaft. The only way to remove the handle is to remove the screw which is another nice design feature. Extending the shaft was easy using a hex coupler and a cut down 3/16" hex wrench.

I designed and 3D printed a two-piece cover plate. It prevents any fumes from passing through the closeout panel and any lateral force from being applied to the valve. Oh yeah.... and it it also hides the off-center hole that I drilled 

Flex Lines & Bulkhead Fittings

My new best friend

I raved over how great aramid-braided PFTE hose and fittings were in my Bullet Proof Hose post. I still really like that stuff, but Abe brought over his hydraulic crimper, a bunch of XRP hose and bags of  XRP crimp fittings. You simply cut the hose with a single snip (no mess, no fraying), slide the end on, orient it the way you want, crimp it and use a micrometer to ensure that the OD is within range. Wow, that's easy. The crimp-style hose ends are smaller and lighter than the reusable AN fittings. In addition, since the crimper applies 35 tons of pressure, it creates a superior connection,. .

Problem is that the machine costs several thousand dollars and you need a die, which costs hundreds of dollars, for every size fitting. So Abe's my new best friend;-)

The last step was to install the lines for the fuel out, fuel in and fuel tank vent. The filter element is trivial to service and everything is serviceable. I also added heat shrink tubing and Deutsch connector to the fuel pump.

low pressure 4.jpg

Fuel Tank Mounting Brackets

To securely mount the fuel tank I fabricated the top brackets out of 1/4" x 4" x 4" aluminum angle. For the front bracket I used 1/4" x 2" aluminum. Because the closeout panel sits on top of the 2" x 6" cross member I made some spacers to clear the close out panel out of 1/2" aluminum bar (the cutout in the middle is to make them lighter). I had Abe, formerly of Kaizen Tuning, TIG weld them to the tank... his welds are a little nicer than mine;-) Most builders tap holes into the 2" x 6" cross member, but I decided to through bolt through it with 3/8" grade 8 screws. After all of that was done, I covered all of the tank's surfaces with vibration damper, which made it a lot heavier!

Fuel Tank Closeout Panel

To mitigate heat and noise intrusion into the cockpit I decided to fabricate an closeout panel to separate the fuel tank compartment from the engine compartment. Some builders decide to do nothing, some build a solid panel (and don't put anything else in the compartment) while others make a full-length panel with an access door so that they can service the low-pressure fuel system.

I wanted to locate the low-pressure system in the compartment, but I realized that even with an access door it would be very hard to service it once the body was on and the high-pressure fuel system was installed. So, after much thought I decided to cut a hole in the floor to service the low-pressure system. I'm pretty sure that I'm the first builder to take that approach.

The close out panel is very simple in concept, but it was a lot of work to finish. The first step was to cut some 0.1" aluminum to the rough size. After that I cut notches around the 2x2's on the floor and then I coped the sides around the weld beads on the chassis. I must have had the panel in and out of the car 40 times to get it to fit perfectly – lots of measuring and small cuts means no big mistakes! Once that was done I drilled and tapped 37 holes

Clecos temporarily holding the panel in place

Clecos temporarily holding the panel in place

Before tapping the holes I mounted the panel with clecos. As discussed in the video above they come from the aviation industry and are extremely useful when fitting panels. I thought that the panel fit perfectly, but when it was held completely flat by the clecos I discovered it was too wide. It was easy to remove all of the clecos, trim the panel and reinstall it.

My daughter helped me tap a bunch of the holes. I thought that I was teaching her something until she explained that she had used a much larger tap to extract tree cores. I then explained the purpose of cutting fluid and once again she was not impressed, "Dad, we coated the tap with wax to do the same thing." LoL so much for me teaching her something.

Once this was done, I cut holes for the fuel filler tube and the shift cables. Although the fuel filler tube is round, I had to make a slotted hole because the fuel tank must be rotated when it's dropped in. Fortunately Will was visiting when I did this so the cuts came out perfect.

Any resemblance to my daughter's pastry roller is purely concidental

Next I covered the engine compartment side with heat shield. It can withstand direct continuous heat up to 1,750° F, but the embossed 10 mil aluminum skin dents easily. I used a special rubber coated roller to ensure it laid flat. Any resemblance to my daughter's beloved pastry roller is purely coincidental. I thought it would be easy to trim the overhang with tin snips, but that didn't work well. I found that a Dremel cutoff wheel worked OK, but the glass-fiber core made a huge mess (if you go this route, do it outside and wear a mask!). In addition, when I drilled the holes the adhesive film hardened on the drill bit... so I had to clean the drill bit 37 times with a razor blade.

I then fabricated some brackets out of right-angle aluminum to seal the sides. Once this was done I installed Second Skin Damplifier Pro on the side that faces the cockpit to deaden vibrations. The last step was to install the panel with 10-24 screws and Permatex Black RTV Silicone Sealant. 

Hydraulic Lift Pump Mounted

I mounted the hydraulic lift pump today. There wasn't an easy way to mount it where I wanted it so I fabricated a bracket. The only right angle aluminum that I had that was tall enough was 1/4" x 4" x 4", which was overkill. After cutting it down to size, drilling the mounting holes and cleaning the edges up on the sander, I milled two openings to reduce weight.

The bracket that comes with (and is required to mount to my bracket) was damaged in shipping so I removed it to straighten it. I noticed that there was some oil between the pump body and the bracket. Apparently, the two mounting bolt thread directly into the pressurized part of the pump. As can be seen in the picture below, they stack two small o-rings on the bolt to prevent the oil from leaking. There are no groves and the pump body has a 2.5" diameter (i.e., it's no flat) which results in a less than ideal seal. I considered using some 1/32" rubber to make a gasket, but that would reduce the amount of thread into the body and the o-rings wouldn't get as compressed. I also thought about 3D printing a curved washer, but I was concerned that it would be so thin that it might eventually crack. So I decided to use a little Room-Temperature-Vulcanizing (RTV) silicon.

After installing it, I realized that I could have tapped two holes into the 2" x 2"for the bottom two bolts and used a much smaller piece of aluminum for the top two bolts... oh well.

To complete the hydraulic lift pump I need to install and plumb the reservoir and plumb the lift rams. To do that I need to order some more hose ends and wait for Penske to return my reconfigured shocks.

Big Hairstyles to Bullet-Proof Hose

That hair, like stainless steel hose, is so 80s!

That hair, like stainless steel hose, is so 80s!

I plumbed the front brake, rear brake and clutch reservoirs today. I upgraded the supplied Wilwood master cylinders and remote reservoirs with ones from Tilton. Amongst other benefits, the Tiltons feature -4 AN outlets rather than push-on barbs. Having made that change, I needed to figure out what type of hose to use because brake fluid is highly toxic and eats through all types of things including most types of automotive hose. This usually means that you need to use Polytetrafluoroethylene (PTFE) hose jacketed in stainless steel.

I used to love stainless hose, but that was in the 80s when I was in high school. IMO, stainless steel hose is as dated as 80's big hair... well, at least the music has stood the test of time! Beyond dated looks, it's heavy and real pain-in-the-ass to install. I will use it where lines are exposed to road debris, but no where else. If you're wondering, I do have the Koul Tools which makes it much easier to install hose ends, but installation goes pretty much like this; I get stabbed, I bleed, and then I swear like a sailor.

In any event, the Aeroquip Startlite hose that I'm using elsewhere isn't compatible with brake fluid and Aeroquip's PFTE hose has a stainless steel jacket... what to do? I found some really nice aramid-braided PFTE hose from Goodridge which can be bought from Pegasus Auto Racing. It's not cheap, but it has lots of benefits; it's:

  • Extremely easy to install; no special tools, no bleeding, and no profanity
  • Lightweight; about 43% lighter than stainless
  • Very flexible; 2-3 times smaller bend radius than standard hose
  • Bullet proof; the aramid sheathing is ballistic-rated for body armor, I have no plan to test that!
  • High-pressure rating; the -4 AN hose is rated to 1,320 psi

In the picture below the foremost object is the PFTE liner with the sheathing removed. This exposes the convoluted outside diameter which is what provides the super-flexible bend radius. Note that the interior diameter is completely smooth. The middle objects are the hose ends. The silver part simply slides over the hose and the black part threads into the hose. The top object shows how flexible the hose is.

The installation instructions suggest that you wrap the point to be cut with low-stick painter's tape. A Dremel cut-off wheel makes a clean cut, but I found that removing the tape caused fraying which was a hassle to stuff into the silver collar. I began using a couple wraps of Teflon tape before the painter's tape which significantly reduced the amount of fraying. I latter figured out that I could just wrap the hose exactly one time with a 1/4" wide piece of painter's tape. After removing any small frays with a high-quality micro shear (I like Xuron), I was able to simply twist the silver collar on without removing the 1/8" of tape (the 1/4" tape was cut in the middle). After putting a couple drops of light oil on the threads, you twist the end on until it's tight and then you spin the silver collar a couple of times... that's it. 

Ok, on to the install. It's important that the lines always pitch up towards the reservoir or are at worst horizontal, to facilitate bleeding the system. You want all air bubbles to flow up to the reservoir and out of the system. I considered keeping all of the bulkhead fittings at the same height, but I couldn't get the hose to lay properly. So I decided to increase the of the bulkhead fittings from left to right. Everything is above the fittings on the pedals and below the fittings on the reservoir. Note that the "horizontal" hose does slope up a bit. To keep the hoses in place I designed and 3D printed a custom bracket.

Spring Soccer in Boston

So it's the first week of spring and here are a few photos from my son's soccer game... yeah, all that white stuff is snow. You'll note that the boys in blue have hats and leg coverings while my son's team, the boys in black, have a hardcore coach who insisted on bare legs and heads. Fortunately it was OK for the parents to remain bundled up.

In any event, it should be apparent why I'm building a SL-C (coupe) rather than a Le Mans (spyder). 

Hydraulic Lift Reservior

Action-packed video with professional voice over

Two posts ago I showed a video of a hydraulic lift test, but I've posted it here again just in case you missed the action-packed sequence:-)

When I removed the shocks I realized that there was no easy way to disconnect the hydraulic lines which means that oil gets everywhere and that I need to re-bleed the system when I put it back together. To solve these issues I purchased some quick disconnects which are tested to 15,000 psi. They enable me to quickly disconnect the hydraulic rams without any fluid leaking.

In addition, I decided to upgrade the hydraulic fluid reservoir from 3/8" push-on barbs to proper -6 AN fittings and hose. I spent a fair amount of time looking for reservoir with AN fittings to no avail. So I decided to modify the supplied one. I purchased a -6 AN Fuel Cell Bulkhead Adapter Fitting from Vibrant Performance which came with a nut and two PFTE washers. I removed the barb with a Dremel cut-off wheel, sanded the bottom flat and then carefully enlarged the hole. The nut was too big to fit so I had to grind it round and press fit it. Now I can sleep better knowing I have a proper AN fitting:-)

The reservoir bracket as supplied is on the left. The hex nut and two PFTE washers are on the right. Note that the nut has already been ground round and that only one of the PTFE washers was used.